


So I made three prints tonight based on recent location scouting. They really aren't great... but I wanted to make them to keep develop my printing skills.
This is what the events of tonight's printing have taught me:
- I still have a lot to learn in Photoshop but I'm a lot better since last time.
- It may be peaceful and a good work environment at uni in the pm-am... but there's no-one here to help. Print during the day!
- Make test prints! If nothing else it saves the inevitable waste of paper!
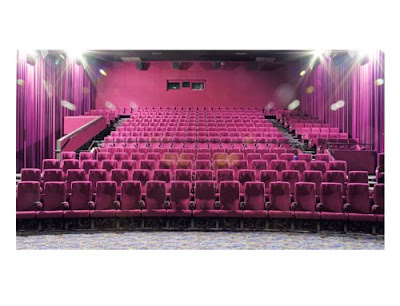
I tried the cinema shot first. This is what it's meant to look like (roughly):

This is what came out:
I really haven't been able to work that out. The other two came out ok so I really don't understand the problem... I'll come back tomorrow and see if someone can help me. All of those unsuccessful attempts did help me memorize the process... It goes a little something like this:
1. Working Profile.
Edit > Assign Profile > Profile > from the drop-down menu select Ekta Space PS 5, J. Holmes > OK
2. Soft Proof
View > Proof Setup > Custom
Device to Simulate > E2400pbISP_PSGbpNCA_D50P
Don't check 'Preserve RGB Numbers'
Rendering Intent > Relative Colormetric
Check 'Black Point Compensation'
Display Options (On-Screen), Check Simulate Paper Color *(I'm nopt sure about Black Inc, it's probably a good idea to check it though).
Then...
View > Gamut Warning
(and this is where you should make any edits, then a test sheet for your test print, so that you can then come back here and edit again!)
3. Print Setup in Photoshop
File > Print... (the '...' indicates that there will be further options in that selection)
Printer > Epson 2400
Page Setup > Format for: Epson 2400, Paper size > A3 (for me... not everyone)
Select the orientation of the page.
I personally didn't have it centre or scale my images because I had worked that out earlier with my canvas size... but it would probably be the smarter/easier thing to do!
Ok, the important stuff...
From the drop down box on the right, select 'Color Management'
Print > Document
Options > Color Handling > Photoshop Manages Colors
Printer Profile is > E2400pbISP_PSGbpNCA_D50P
Rendering Intent > Relative Colormetric
Tick 'Black Point Compensation'
Hit 'Print...'
4. Epson Printer Driver Settings
Printer: 2400
Presets > Standard (the saved ones aren't very reliable), then the following:


No comments:
Post a Comment