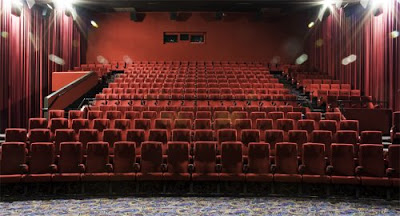
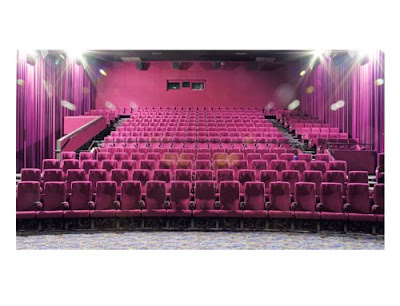
Hiroshi Sugimoto has been working on this project since the 1970's. He takes his large format camera into the theatre and exposes the film for the duration of the screening. It's beautiful.
Wednesday, 30 April 2008
printing for review 2
So I made three prints tonight based on recent location scouting. They really aren't great... but I wanted to make them to keep develop my printing skills.
This is what the events of tonight's printing have taught me:
- I still have a lot to learn in Photoshop but I'm a lot better since last time.
- It may be peaceful and a good work environment at uni in the pm-am... but there's no-one here to help. Print during the day!
- Make test prints! If nothing else it saves the inevitable waste of paper!
I tried the cinema shot first. This is what it's meant to look like (roughly):

This is what came out:

I really haven't been able to work that out. The other two came out ok so I really don't understand the problem... I'll come back tomorrow and see if someone can help me. All of those unsuccessful attempts did help me memorize the process... It goes a little something like this:
1. Working Profile.
Edit > Assign Profile > Profile > from the drop-down menu select Ekta Space PS 5, J. Holmes > OK
2. Soft Proof
View > Proof Setup > Custom
Device to Simulate > E2400pbISP_PSGbpNCA_D50P
Don't check 'Preserve RGB Numbers'
Rendering Intent > Relative Colormetric
Check 'Black Point Compensation'
Display Options (On-Screen), Check Simulate Paper Color *(I'm nopt sure about Black Inc, it's probably a good idea to check it though).
Then...
View > Gamut Warning
(and this is where you should make any edits, then a test sheet for your test print, so that you can then come back here and edit again!)
3. Print Setup in Photoshop
File > Print... (the '...' indicates that there will be further options in that selection)
Printer > Epson 2400
Page Setup > Format for: Epson 2400, Paper size > A3 (for me... not everyone)
Select the orientation of the page.
I personally didn't have it centre or scale my images because I had worked that out earlier with my canvas size... but it would probably be the smarter/easier thing to do!
Ok, the important stuff...
From the drop down box on the right, select 'Color Management'
Print > Document
Options > Color Handling > Photoshop Manages Colors
Printer Profile is > E2400pbISP_PSGbpNCA_D50P
Rendering Intent > Relative Colormetric
Tick 'Black Point Compensation'
Hit 'Print...'
4. Epson Printer Driver Settings
Printer: 2400
Presets > Standard (the saved ones aren't very reliable), then the following:
Tuesday, 29 April 2008
obsessional organisation
One of the reasons I started this was blog was to increase my productivity. I suffer from a very unreliable memory, so this is a great way for me to store information that I would like access from later and from somewhere else. I also really want to establish an effective workflow, now, while I'm still at uni, for projects, life, work... everything. For me that involves writing and recording... and of course documenting.
A big part of this process can be very simple - lists. But scribbling indecipherable jibberish on random scraps of paper tends to end up lost (and then found again in found) and useless. So listography is now where I transfer my scribbles, so that I can cross things off (good for the soul), and continue to update all those things I don't want to forget. It would make a good home page for anyone who's likely to get lost in internet infomania, instead of doing all those constructive things you dialled up for. It's pretty basic, and offers a much prettier version in old-school paper style... but this works for me.
Update: I found a better alternative for the list and to-do addicts... Remember the Milk. Its cool check it out. If you wanna be nosy and stalk me there too you can probably search for me... jeanc!
Update: I found a better alternative for the list and to-do addicts... Remember the Milk. Its cool check it out. If you wanna be nosy and stalk me there too you can probably search for me... jeanc!
printing basics references
If I'm to print a full size A3 print on of of these printers, I can print right to the edge if I choose the right settings in the printer driver? Otherwise the margins are 3mm left/right, 20mm top/bottom.
A3 paper: 297mm x 420mm/11.7" x 16.5"
I'm not planning on doing this anyway but I think it's important to know the printable area when you start prepping for printing in Photoshop.
Ok, now I'm confused. Why is an A3 printer suggesting it can print a larger area than the surface of the paper? I'm going to make a new canvas in Photoshop, the size of an A3 minus the margins (assuming you have to do it for each 4 sides). That will be:
291mm x 380mm
I'm moving my images onto this canvas, resized for printing at:
35cm x 18.92, pixels, 2480 x 1341. Resolution of 180.
Cross your fingers xx
aspect ratios
This series should be presented in a cinematic style.
I'll obviously have to crop the images fairly heavily if I'm going to shoot with the Hassleblad, less so if large format. Either way, I've gotta decide pretty soon which one to go for, so I can get a better idea in my head about what I want to do. I'm leaning towards cinema - 1.85:1
Saturday, 26 April 2008
content
I've decided to open up the interestingess channels and invite posts from special guests.
I'll be inviting academics, established and emerging artists, writers, peers and more.
The content is up to the author. It would be nice if it related to my project (think 'why do we (especially generation y) feel so compelled to constantly engage in screen-based media?'), but I find everything interesting so whether it be technical, something you think everyone should know, or even something as pop culture as why you like watching Buffy so much... I'm interested. Writing itself is not even required. If you'd just like to share an image/video/link... I'm interested.
Forward this on to anyone you think would be interested, or send your ideas to s3162611 at student.rmit.edu.au
Thanks!
flash kit, hassleblad + home studio

Since the studio was ready, I borrowed one of the new Broncolor kits with a Hassleblad with a 50mm lens. Very exciting.
I packed it all nice and safely into my car (with seatbelts!), and when I got home carefully examined the contents. 3 heads, a softbox, two barn doors, an umbrella and a sync cord.
I extended the stands, with the centre column remaining close to the ground, feet out at about 45 degrees. I wasn't sure but that felt most logical to me, and I remembered at Deakin in Film we had sandbags on the poles between the legs and centre column, so I assumed I was doing the right thing. I arranged them in my preferred positions around the room.Then I got the heads out, loosened the head attachment and adjoing screw which holds it in place, and gave all the heads a new home. Then I begun investigating the attachments.
It took me a while to work out how to attach the barn doors. Finally I realised it squeezed into the inner circumference of the bulb shade. Easy.
The umbrella was pretty straightforward, just slide the pole into the side of the head, and attach the smaller bulb head.
The softbox was the trickiest. The bulb head was a heavy metallic disk, with holes for poles in the side. Extra holes were for different shaped softbox's. I worked out how to insert the poles and the cover... but the white softbox front cover seemed too small, impossible to velcro on. I finally realised that you had to pull the side covers back, poke the poles into the corners of the front cover (much stronger material than it seems), and once you've got that all in place, pull the side cover back up and velcro together.
So, I was ready to go. But no-one to shoot. I really wanted to try portraits, although I should have been working on my project. But I really just wanted to familiarise myself with the lights, not get too adventurous this time. But not only had I just spent my last $40 on 120 film (Kodak Velvia VC 160 - 6 rolls from the eager salesman at Ted's), I realised the kit didn't contain a hotshoe adapter for the sync cord. I knew I could trigger the flashes with the on camera flash on my 400D, but I hated having to use my flash (I hadn't yet realised I could turn it down), and I really wanted to have a go at the Hassleblad.
The next day I took some outdoor shots with the Hassleblad, it was such a different experience than using an SLR. It had a prism veiwfinder, and it was big! The wide angle tripped me out, I couldn't stop looking through it! I found it a bit difficult to focus though. I've always suspected my right eye isn't as good as the other so I think I should check that out.
A very helpful person informed me that there was a connection point in the Hassleblad lens. Of course! It was so obvious. I had even just re-read the medium format chapter in Ansel Adams' The Camera, and it specifically discusses Hassleblad's and how they're organised in components. The prism hotshoe doesn't even have connection points, its only purpose is to hold an on-camera flash. Everything else is dependant upon the lens.
Well I still had no subjects until a reluctant friend dropped in to lend me her MacBook, and I convinced her to be my guinea pig. From what I shot on the 400D, I needed to adjust the brigtness and/or distance of the lights from the subject and back wall.
When she left another friend told me he was setting up a myspace music page for a friend he's written with. He wanted to know if I could shoot some stuff for the profile. Perfect, come over now! I only had about half an hour with them, but it was great fun. I was a bit more accustomed to the set-up, my subject was playing some really nice acoustic stuff, and an amazing and soft Smashing Pumpkins cover, and I mostly just had to wait for those magic moments (and change lenses, batteries, film...). It was really fun. I think we all felt pretty special doing our things.


Labels:
400D,
broncolor,
canon,
hassleblad,
lighting,
medium format,
studio
Subscribe to:
Posts (Atom)


